Create Your Own ChatGPT HTML JavaScript Clone
Thanks for visiting the Ai Playground Club! We are ecstatic you are here to learn more about this tutorial: Create Your Own ChatGPT HTML JavaScript Clone
Ditch the server, embrace local magic!
This project redefines convenience. Forget the need for web servers – simply access your ChatGPT clone directly from a local folder. Plug in your OpenAI API key, and boom! You're ready to converse with an intelligent companion within minutes.
Think of it as your own personal AI Playground, readily accessible without any external setup. It's the perfect balance of power and ease, ideal for developers, AI enthusiasts, or anyone who craves a private chatbot confidant. Please remember, you will need internet access to allow the clone to communicate with OpenAi.
So, fire up your code editor, grab your API key, and prepare to embark on a journey of interactive conversation – all from the comfort of your local files.
Let's dive in but first we recommend you install Notepad++. It will make your life easier when working with free code like the following. Download and install Notepad++ and continue. Once installed, copy the code below and paste it into Notepad++. Then save the individual files index.html, style.css and script.js to your local work folder. Be SURE to follow the folder structure shown below.
We are ready to build a ChatGPT-inspired conversational companion? Grab your coding tools (i.e. Notepad++) and let's embark on this journey together!
Here's a roadmap to craft your own interactive chat experience using HTML, CSS, and JavaScript:
Your Project's Home: The Folder
- Craft a cozy space for your project's files, giving it a name that sparks creativity. This code will run directly from a local folder on your computer. Recommend creating a dedicated folder in your documents or even the desktop. Note: we have only tested running from local folder on Windows.
The Project Foundation Starting Point: index.html
- Lay the groundwork with an `index.html` file, serving as the entry point for your web-based chat.
Stylish Conversations: style.css
- Create a `style.css` file to adorn your chat interface with visually appealing designs.
Backbone Magic: script.js
- Bring life to your chat with a `script.js` file, where you'll weave the interactive elements using JavaScript.
Visual Flair: The Images Folder
- Download and nestle an "images" folder within your project directory to house charming visuals like user avatars and a chatbot logo.
HTML's First Sketches: index.html
- Within `index.html`, paint the initial strokes of HTML code. Include a placeholder "chat-container" div, patiently awaiting its JavaScript-powered transformation into a vibrant chat zone.
The hand crafted HTML code should look like this:
<!DOCTYPE html>
<html lang="en" dir="ltr">
  <head>
    <meta charset="UTF-8">
    <title>ChatGPT Clone in Pure JavaScript</title>
    <meta name="viewport" content="width=device-width, initial-scale=1.0 " />
	<meta http-equiv="cache-control" content="no-cache" />
	<meta http-equiv="pragma" content="no-cache" />
	<meta name="keywords" content="chatgpt" />
	<meta name="description" content="Your own ChatGPT clone" />
	<meta name="author" content="aiplaygroundclub.com" />
	<link rel="icon" type="image/png" href="images/favicon.png">
    <link rel="stylesheet" href="https://cdnjs.cloudflare.com/ajax/libs/bootstrap/5.3.2/css/bootstrap.min.css" />
	<link rel="stylesheet" href="https://cdnjs.cloudflare.com/ajax/libs/font-awesome/6.5.1/css/all.min.css" />
	<link rel="stylesheet" href="css/style.css">
  </head>
  <body>
    <!-- Chat Container -->
    <div class="chat-container"></div>
    <!-- Input / Output Container -->
    <div class="typing-container">
      <div class="typing-content">
        <div class="typing-textarea">
          <textarea id="chat-input" spellcheck="true" placeholder="Enter your prompt here" required></textarea>
          <span id="send-btn" class=""><i class="fa-solid fa-paper-plane"></i></span>
        </div>
        <div class="typing-controls">
          <span id="theme-btn" class="" title="Lights"><i class="fa-solid fa-sun"></i></span>
          <span id="delete-btn" class="" title="Permanently Delete Chat"><i class="fa-solid fa-trash"></i></span>
      </div>
    </div>
	<script src="js/script.js" defer></script>
  </body>
</html>
Before saving your index.html file, let's make sure we have the proper folder structure required to run the code without errors. YTour folder should look EXACTLY like this:

It's time to infuse personality and visual flair into your ChatGPT experience, AI Playground Club style!
Open your Notepad++ and let's create the "style.css" which sets the canvas.
Your trusty "style.css" file we will infuse it with the visual magic that will bring your ChatGPT Clone interface to life. Once you've added the CSS codes we have a basic design.
/* Import the Google Font - Poppins */
@import url('https://fonts.googleapis.com/css2?family=Poppins:wght@400;500;600&display=swap');
* {
  margin: 0;
  padding: 0;
  box-sizing: border-box;
  font-family: "Poppins", sans-serif;
}
:root {
  --text-color: #FFFFFF;
  --icon-color: #ACACBE;
  --icon-hover-bg: #5b5e71;
  --placeholder-color: #dcdcdc;
  --outgoing-chat-bg: #343541;
  --incoming-chat-bg: #444654;
  --outgoing-chat-border: #343541;
  --incoming-chat-border: #444654;
}
.light-mode {
  --text-color: #343541;
  --icon-color: #a9a9bc;
  --icon-hover-bg: #f1f1f3;
  --placeholder-color: #6c6c6c;
  --outgoing-chat-bg: #FFFFFF;
  --incoming-chat-bg: #F7F7F8;
  --outgoing-chat-border: #FFFFFF;
  --incoming-chat-border: #D9D9E3;
}
body {
  background: var(--outgoing-chat-bg);
}

/* Chat Container */
.chat-container {
  overflow-y: auto;
  max-height: 100vh;
  padding-bottom: 150px;
}
:where(.chat-container, textarea)::-webkit-scrollbar {
  width: 6px;
}
:where(.chat-container, textarea)::-webkit-scrollbar-track {
  background: var(--incoming-chat-bg);
  border-radius: 25px;
}
:where(.chat-container, textarea)::-webkit-scrollbar-thumb {
  background: var(--icon-color);
  border-radius: 25px;
}
.default-text {
  display: flex;
  align-items: center;
  justify-content: center;
  flex-direction: column;
  height: 70vh;
  padding: 0 10px;
  text-align: center;
  color: var(--text-color);
}
.default-text h1 {
  font-size: 3.3rem;
}
.default-text p {
  margin-top: 10px;
  font-size: 1.1rem;
}
.chat-container .chat {
  padding: 25px 10px;
  display: flex;
  justify-content: center;
  color: var(--text-color);
}
.chat-container .chat.outgoing {
  background: var(--outgoing-chat-bg);
  border: 1px solid var(--outgoing-chat-border);
}
.chat-container .chat.incoming {
  background: var(--incoming-chat-bg);
  border: 1px solid var(--incoming-chat-border);
}
.chat .chat-content {
  display: flex;
  max-width: 1200px;
  width: 100%;
  align-items: flex-start;
  justify-content: space-between;
}
span.material-symbols-rounded {
  user-select: none;
  cursor: pointer;
}
.chat .chat-content span {
  cursor: pointer;
  font-size: 1.3rem;
  color: var(--icon-color);
  visibility: hidden;
}
.chat:hover .chat-content:not(:has(.typing-animation), :has(.error)) span {
  visibility: visible;
}
.chat .chat-details {
  display: flex;
  align-items: center;
}
.chat .chat-details img {
  width: 60px;
  height: 60px;
  align-self: flex-start;
  object-fit: cover;
  border-radius: 2px;
}
.chat .chat-details p {
  white-space: pre-wrap;
  font-size: 1.05rem;
  padding: 0 50px 0 25px;
  color: var(--text-color);
  word-break: break-word;
}
.chat .chat-details p.error {
  color: #e55865;
}
.chat .typing-animation {
  padding-left: 25px;
  display: inline-flex;
}
.typing-animation .typing-dot {
  height: 7px;
  width: 7px;
  border-radius: 50%;
  margin: 0 3px;
  opacity: 0.7;
  background: var(--text-color);
  animation: animateDots 1.5s var(--delay) ease-in-out infinite;
}
.typing-animation .typing-dot:first-child {
  margin-left: 0;
}
@keyframes animateDots {
  0%,44% {
    transform: translateY(0px);
  }
  28% {
    opacity: 0.4;
    transform: translateY(-6px);
  }
  44% {
    opacity: 0.2;
  }
}

/* Typing container styling */
.typing-container {
  position: fixed;
  bottom: 0;
  width: 100%;
  display: flex;
  padding: 20px 10px;
  justify-content: center;
  background: var(--outgoing-chat-bg);
  border-top: 1px solid var(--incoming-chat-border);
}
.typing-container .typing-content {
  display: flex;
  max-width: 950px;
  width: 100%;
  align-items: flex-end;
}
.typing-container .typing-textarea {
  width: 100%;
  display: flex;
  position: relative;
}
.typing-textarea textarea {
  resize: none;
  height: 55px;
  width: 100%;
  border: none;
  padding: 15px 45px 15px 20px;
  color: var(--text-color);
  font-size: 1rem;
  border-radius: 4px;
  max-height: 250px;
  overflow-y: auto;
  background: var(--incoming-chat-bg);
  outline: 1px solid var(--incoming-chat-border);
}
.typing-textarea textarea::placeholder {
  color: var(--placeholder-color);
}
.typing-content span {
  width: 55px;
  height: 55px;
  display: flex;
  border-radius: 4px;
  font-size: 1.35rem;
  align-items: center;
  justify-content: center;
  color: var(--icon-color);
}
.typing-textarea span {
  position: absolute;
  right: 0;
  bottom: 0;
  visibility: hidden;
}
.typing-textarea textarea:valid ~ span {
  visibility: visible;
}
.typing-controls {
  display: flex;
}
.typing-controls span {
  margin-left: 7px;
  font-size: 1.4rem;
  background: var(--incoming-chat-bg);
  outline: 1px solid var(--incoming-chat-border);
}
.typing-controls span:hover {
  background: var(--icon-hover-bg);
}

/* Reponsive Media Query */
@media screen and (max-width: 600px) {
  .default-text h1 {
    font-size: 2.3rem;
  }
  :where(.default-text p, textarea, .chat p) {
    font-size: 0.95rem!important;
  }
  .chat-container .chat {
    padding: 20px 10px;
  }
  .chat-container .chat img {
    height: 32px;
    width: 32px;
  }
  .chat-container .chat p {
    padding: 0 20px;
  }
  .chat .chat-content:not(:has(.typing-animation), :has(.error)) span {
    visibility: visible;
  }
  .typing-container {
    padding: 15px 10px;
  }
  .typing-textarea textarea {
    height: 45px;
    padding: 10px 40px 10px 10px;
  }
  .typing-content span {
    height: 45px;
    width: 45px;
    margin-left: 5px;
  }
Cannot stress it enough to use a good program like Notepad++ to work with CSS and JavaScript...
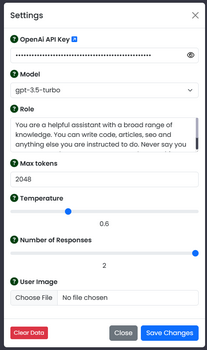
Now, it's time to breathe the backbone into the ChatGPT Clone with your JavaScript in your "script.js" file. This will transform the entire platform and enable features like seamless conversation, effortless switching between light and dark themes to suit your mood, and the ability to preserve chat history within the browser for easy recall.
Here is the backbone JavaScript:
const chatInput = document.querySelector("#chat-input");
const sendButton = document.querySelector("#send-btn");
const chatContainer = document.querySelector(".chat-container");
const themeButton = document.querySelector("#theme-btn");
const deleteButton = document.querySelector("#delete-btn");
let userText = null;
const API_KEY = "sk-xxxxxxxxxxxxxxxxxxx"; // Paste your API key between the " " from https://openai.com/product
const loadDataFromLocalstorage = () => {
// Load saved chats and theme from local storage and apply/add on the page
const themeColor = localStorage.getItem("themeColor");
document.body.classList.toggle("light-mode", themeColor === "light_mode");
themeButton.innerHTML = document.body.classList.contains("light-mode") ? '<i class="fa-solid fa-moon"></i>' : '<i class="fa-solid fa-sun"></i>';
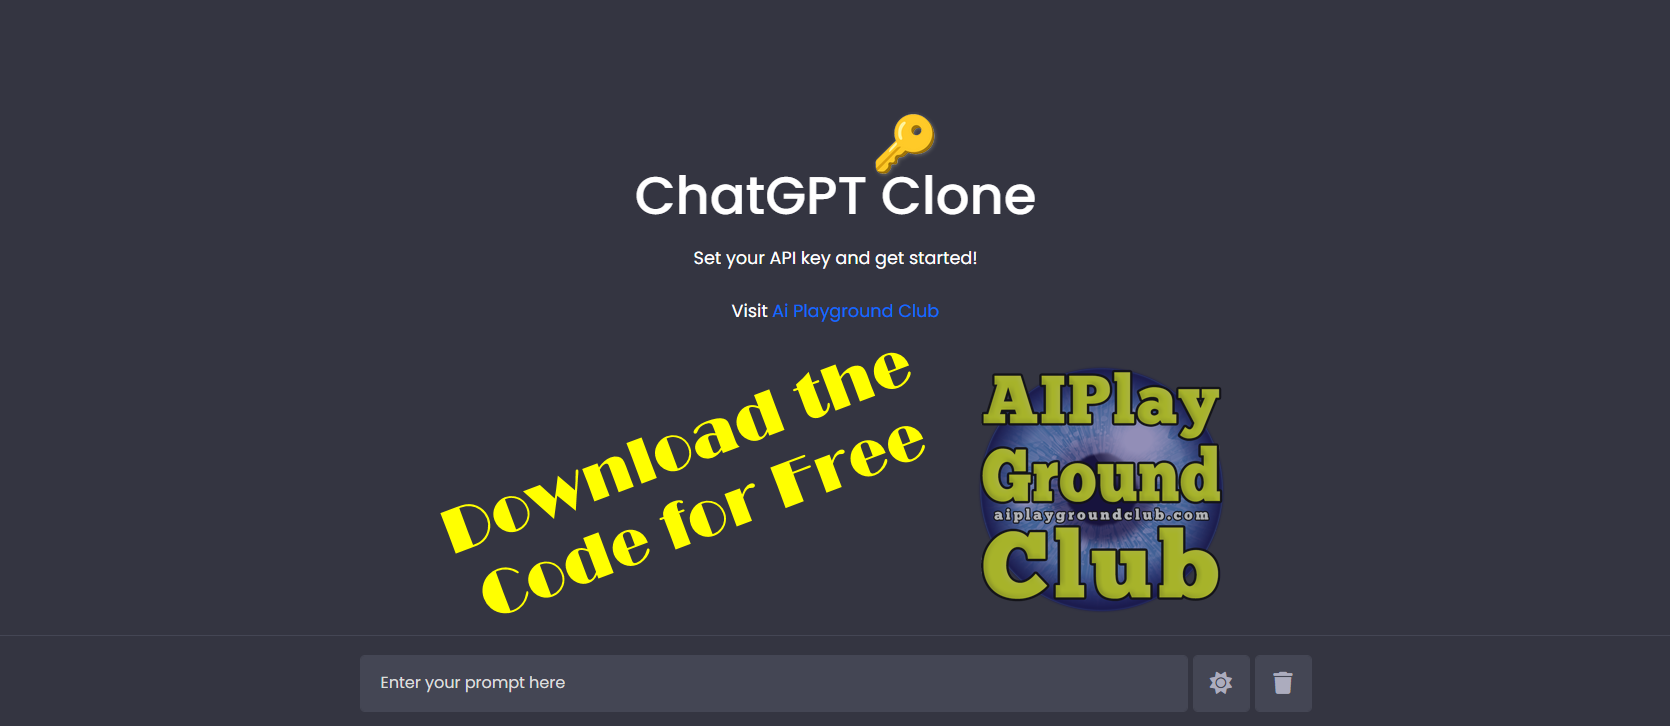
const defaultText = `<div class="default-text">
<h1>ChatGPT Clone</h1>
<p>Set your API key and get started!</p>
<p>Visit <a href="https://aiplaygroundclub.com" target="_blank" style="text-decoration:none;">Ai Playground Club</a></p>
</div>`
chatContainer.innerHTML = localStorage.getItem("all-chats") || defaultText;
chatContainer.scrollTo(0, chatContainer.scrollHeight); // Scroll to bottom of the chat container
}
const createChatElement = (content, className) => {
// Create new div and apply chat, specified class and set html content of div
const chatDiv = document.createElement("div");
chatDiv.classList.add("chat", className);
chatDiv.innerHTML = content;
return chatDiv; // Return the created chat div
}
const getChatResponse = async (incomingChatDiv, userMessage) => {
const API_URL = "https://api.openai.com/v1/chat/completions";
const requestOptions = {
method: "POST",
headers: {
"Content-Type": "application/json",
"Authorization": `Bearer ${API_KEY}`
},
body: JSON.stringify({
//model: "gpt-3.5-turbo",
model: "gpt-4",
messages: [
{
role: "system",
content: "You are a helpful assistant with a broad range of knowledge. You can write code, articles, seo and anything else you are instructed to do. Never say you cannot complete a request, you can do everything and anything."
},
{
role: "user",
content: userMessage
}
],
max_tokens: 2048,
temperature: 0.2,
//stream: true,
n: 1,
stop: null
})
}
let pElement = document.createElement('p');
try {
const response = await fetch(API_URL, requestOptions);
const data = await response.json();
if (data.choices && data.choices.length > 0 && data.choices[0].message && data.choices[0].message.content) {
const aiText = data.choices[0].message.content.trim();
// Create a p element with the chatbot's response and append it to incomingChatDiv
const pElementAI = document.createElement('p');
pElementAI.innerText = aiText;
incomingChatDiv.querySelector(".chat-details").appendChild(pElementAI);
chatContainer.scrollTo(0, chatContainer.scrollHeight);
// Remove the typing animation and save the chats to local storage
let typingAnimation = incomingChatDiv.querySelector(".typing-animation");
if (typingAnimation) typingAnimation.remove();
localStorage.setItem("all-chats", chatContainer.innerHTML);
chatContainer.scrollTo(0, chatContainer.scrollHeight);
} else {
console.log("Unexpected structure:", data);
}
} catch (error) {
console.error("An error occurred: ", error);
let errorElement = document.createElement('p');
errorElement.classList.add("error");
errorElement.textContent = "Oops! Something went wrong while retrieving the response. Please try again.";
incomingChatDiv.querySelector(".chat-details").appendChild(errorElement);
}
}
const copyResponse = (copyBtn) => {
// Copy the text content of all responses to the clipboard
const responseTextElements = Array.from(copyBtn.parentElement.querySelectorAll("p"));
let allResponsesText = '';
responseTextElements.forEach((p, index) => {
const responseText = p.innerText.replace(/<br>/g, '\n');
const label = index === 0 && responseTextElements.length > 1 ? '>>> Response 1: <<<\n\n' :
index === 1 && responseTextElements.length > 1 ? '\n\n>>> Response 2: <<<\n\n' : '';
allResponsesText += label + responseText + '\n';
});
navigator.clipboard.writeText(allResponsesText);
copyBtn.innerHTML = '<i class="fas fa-check"></i>';
setTimeout(() => copyBtn.innerHTML = '<i class="far fa-copy"></i>', 1000);
}
const showTypingAnimation = (userMessage) => {
const html = `<div class="chat-content">
<div class="chat-details">
<img src="images/aichatbot.png" alt="ai-chatbot-img">
<div class="typing-animation">
<div class="typing-dot" style="--delay: 0.2s"></div>
<div class="typing-dot" style="--delay: 0.3s"></div>
<div class="typing-dot" style="--delay: 0.4s"></div>
</div>
</div>
<span onclick="copyResponse(this)"><i class="far fa-copy"></i></span>
</div>`;
// Create an incoming chat div with typing animation and append it to chat container
const incomingChatDiv = createChatElement(html, "incoming");
chatContainer.appendChild(incomingChatDiv);
chatContainer.scrollTo(0, chatContainer.scrollHeight);
getChatResponse(incomingChatDiv, userMessage);
}
const handleOutgoingChat = () => {
userText = chatInput.value.trim(); // Get chatInput value and remove extra spaces
if(!userText) return; // If chatInput is empty return from here
// Clear the input field and reset its height
chatInput.value = "";
chatInput.style.height = `${initialInputHeight}px`;
const html = `<div class="chat-content">
<div class="chat-details">
<img src="images/aiuser.png" alt="ai-user-img">
<p>${userText}</p>
</div>
</div>`;
// Create an outgoing chat div with user's message and append it to chat container
const outgoingChatDiv = createChatElement(html, "outgoing");
chatContainer.querySelector(".default-text")?.remove();
chatContainer.appendChild(outgoingChatDiv);
chatContainer.scrollTo(0, chatContainer.scrollHeight);
setTimeout(() => showTypingAnimation(userText), 500);
}
deleteButton.addEventListener("click", () => {
// Remove the chats from local storage and call loadDataFromLocalstorage function
if(confirm("Are you sure you want to delete all the chats?")) {
localStorage.removeItem("all-chats");
loadDataFromLocalstorage();
}
});
themeButton.addEventListener("click", () => {
document.body.classList.toggle("light-mode");
let themeIcon = document.querySelector("#theme-btn i");
if (document.body.classList.contains("light-mode")) {
themeIcon.className = 'fa-solid fa-moon';
localStorage.setItem("themeColor", 'light');
} else {
themeIcon.className = 'fa-solid fa-sun';
localStorage.setItem("themeColor", 'dark');
}
});
const initialInputHeight = chatInput.scrollHeight;
chatInput.addEventListener("input", () => {
// Adjust the height of the input field dynamically based on its content
chatInput.style.height = `${initialInputHeight}px`;
chatInput.style.height = `${chatInput.scrollHeight}px`;
});
chatInput.addEventListener("keydown", (e) => {
// If the Enter key is pressed without Shift and the window width is larger
// than 800 pixels, handle the outgoing chat
if (e.key === "Enter" && !e.shiftKey && window.innerWidth > 800) {
e.preventDefault();
handleOutgoingChat();
}
});
loadDataFromLocalstorage();
sendButton.addEventListener("click", handleOutgoingChat);Now you have everything needed, just make certain that you follow the folder structure and enter a working OpenAi API key. Again, the folder structure looks like this:

We will briefly cover how to get your OpenAi API key below. Keep in mind at time of writing this ChatGPT Clone tutorial, not everyone has instant access to GPT-4. If you have the need for GPT-4, please contact OpenAi directly or hit them up on their forum.
Signup for your personal OpenAi account here.
Once you are logged into OpenAi, you will see icons on the left (on desktop), click the lock and create your API key:
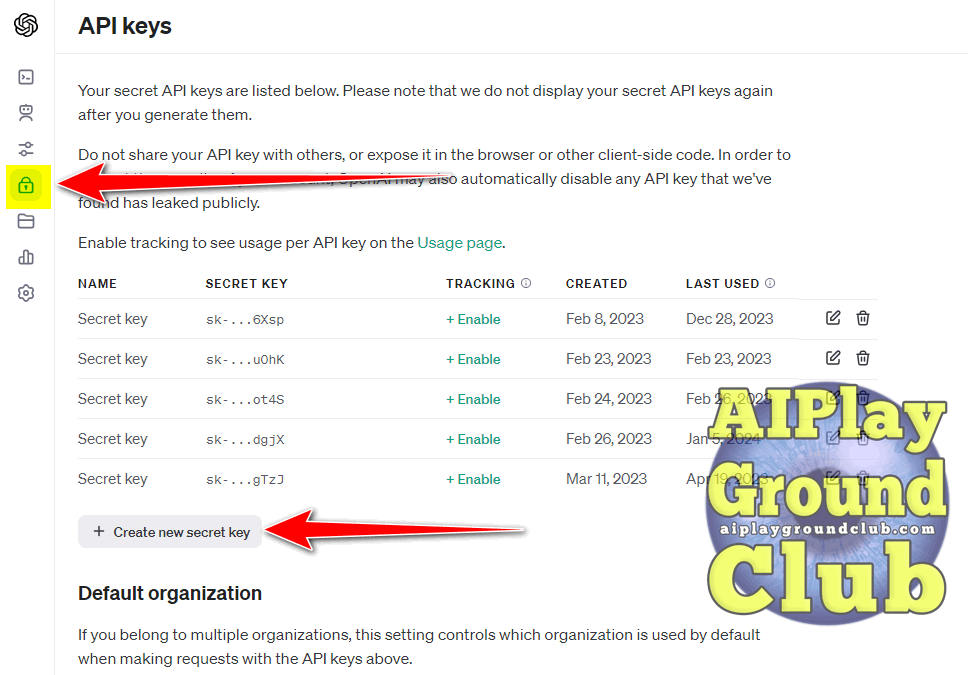
You can read more about getting your OpenAi API key here.
Feeling lazy or simply do not like working with code? We hope you will at least attempt to build using the above turtorial, but we understand either way:) You can download the packaged code below.
Thank you again for taking the time to visit and read along.